Wooden furniture is a beautiful option for most types of furniture and it can really enhance the look of your home. While many people appreciate wooden furniture for its appearance, it is very susceptible to damage such as stains and discoloration, scratches and dents, and cracks and gouges from a number of different sources. Wooden furniture is typically quite expensive so it is much more cost effective to repair wooden furniture instead of replacing it. The following is a guide for repairing several types of damage that can be inflicted on your wooden furniture.
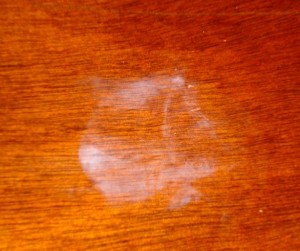
Removing Stains from Wood Furniture
All wooden furniture is protected with a finish but sometimes the finish can become damaged and cause stains and discoloration on the surface. It is important to remember to only remove as much of the finish as you need to when removing these types of stains from wooden furniture.
- White Spots: White spots occur as a result of spills or condensation because shellac and lacquer finishes are not resistant to water. If you notice a white spot on your furniture, try buffing the spot firmly with furniture polish and use denatured alcohol if that does not work. If buffing is not enough, use gentle abrasives and apply along the wood grain then wipe the surface clean with a soft cloth. If that does not work, you can use a harsher abrasive made of rottenstone and linseed oil until the spots are removed. Clean the area when done and apply two coats of hard furniture wax over the area and buff until it shines.
- Blushing: Blushing is the white haze that can overtake an entire piece of furniture and it is usually caused by moisture. This can be removed by lightly buffing the surface with light steel wool dipped in linseed oil along the wood grain until the haze is removed. Reamalgamation can also be used to remove blushing. Once the blushing is removed, wipe the surface with a clean cloth, apply two coats of hard furniture wax and buff to a shine.
- Black Spots: Black spots occur when water has penetrated the finish down to the wood. The finish must be removed to repair the black spots and if they are not limited to one spot, the whole piece may need to be refinished. After removing the finish, bleach the stained surface with an oxalic acid solution and refinish the furniture.
Repairing Scratches and Nicks on Wood Furniture
Wooden furniture may sustain a number of nicks and scratches from regular use and most of the time they are quite simple to repair.
- Scratches: Light scratches can be hidden by rubbing the meat of a walnut, pecan, or Brazil nut along the scratch to darken it. To repair areas with several shallow scratches, use hard paste wax and No. 0000 steel wool to lightly stroke the wood grain then buff the surface with a clean cloth. For deep scratches, use furniture-patching wax sticks in a color that matches the finish. Run the stick along the scratch to fill it with wax and gently scrape the excess wax away when you are finished. Wooden furniture that has several deep scratches should be refinished.
- Dings or Nicks: Dings are tiny chips or scratches in the finish that may not go deep enough to affect the wood. Start by using a sharp knife to remove loose finish around the spot and use the flat, sharp edge of the blade to carefully scrape the spot without damaging the wood. Then feather the edges of the spot with light steel wool and wipe the area with a cloth dipped in mineral spirits. Once the area is completely dry, use a small artists brush to apply the appropriate finish over the spot. After the finish dries, buff the spot with steel wool and wax and polish the entire piece until the refinished spot blends in.
For a list of household remedies that can repair nicks and scratches on wooden furniture, click here.
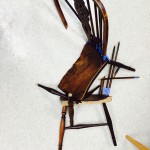 Broken chair |
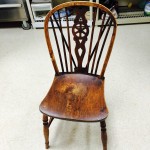 Repaired chair |
Images: courtesy of Furniture Medic by MasterCare Experts – Wheaton, IL
Repairing Broken Wooden Furniture
Sometimes wooden furniture may break around the corners and edges or could sustain similar damage if it is chewed by a dog. The following process will help you repair broken wooden furniture and furniture that has been chewed up.
- Prepare the Area: If your furniture has been chewed up, start by using a utility knife blade to cut small hatch marks across the chew marks and scrape away frayed edges. If you are repairing a broken edge or corner, clamp a piece of scrap wood beneath the broken area.
- Apply Wood Filler: First, the filler must be mixed with the catalyst that will cause it to harden. After it is mixed, apply the filler quickly to the damaged or broken area while keeping in mind that it will harden in five minutes or less. Make sure to apply the filler to one area at a time that has been chewed and if you are fixing a broken area, make sure the filler fills all the gaps so it can be shaped like the original piece.
- Remove Extra Filler: Once the filler is dry to the touch, use a utility knife to cut away the excess resin. As you remove the excess filler, try to reshape the damaged area so that it is easier to sand down to the final shape. If you are repairing a broken edge or corner, remove the clamped wood support and use a wood rasp or stainless steel micro-blade to shape the fully hardened wood filler to recapture its original look.
- Sand the Wood Filler Smooth: When sanding chewing damage, use 150-grit sandpaper to blend the edges of the damaged area and feather it together by sanding the surrounding non-damaged area. A wax stick crayon may be needed to fill any fine holes. When sanding a repaired broken edge or corner, wrap sandpaper around a wooden dowel that matches the contours of the furniture to sand the repaired area.
- Paint the Filler: After the filler is dry and smoothed into shape, it is time to apply the color. Wood filler will not accept wood stain so it must be colored with acrylic paint. Use a combination of colors such as red, yellow, and orange with brown to create a color that matches the rest of the wood. You may need to apply several coats to get the color to match.
- Apply the Finish: Once the acrylic paint has dried, spray the repaired surface with clear lacquer finish. If necessary, cover the surrounding areas of the furniture with painters tape and newspaper. Spray the lacquer until the sheen is slightly shinier than needed and then use light steel wool to buff the sheen and match it to the rest of the piece.
By following these repair tips, you can repair stains, scratches and nicks, and broken or chewed up wooden furniture. If you do not feel comfortable repairing and refinishing your own wooden furniture, you can contact a trusted furniture repair professional to repair the damage. Repairing your wooden furniture will revitalize its look without having to replace it.


